Showing posts with label sewing. Show all posts
Showing posts with label sewing. Show all posts
Tuesday, January 31, 2012

Sunday, January 29, 2012
KISS ME PILLOW

Nothing spells romance like a pair of red lips! Give a huggable kiss to your sweetheart with this Kiss Me Pillow or use it as cute Valentine’s Day throw. Aleene’s® Fabric Fusion™ makes this lovely project a cinch; use it to adhere the fabric pieces together. Materials List
Instructions 1. Fold red fabric in half and freehand draw lips onto fabric in desired size. 2. Keeping the fabric folded, cut out lips pattern, making sure to cut through both layers of fabric. Trim edges if needed. 3. Apply Aleene’s® Fabric Fusion™ along border of one of the lip-shaped pieces of fabric. **Leave a small section without glue. This will be the opening for stuffing with polyfil. Press the other lip-shaped piece of fabric on top of the piece with Fabric Fusion™, firmly pressing into glue. Let dry. 4. Once dry, pull fabric inside-out through opening and stuff fabric with desired amount of Polyfil. 5. Use needle and red thread to hand stitch the opening. 6. Use chalk to draw a line through middle of lips. (See picture for position.) With needle and red thread, stitch across chalk line, making sure to stitch through both layers of fabric. 7. Using chalk, write the words “KISS ME” in your desired font/script. Place Crystals over letters using tweezers. 8. Following Heat-Setting Tool instructions, place tip of tool on top of a Crystal and hold for 5 to 6 seconds. Repeat for all Crystals. | ||||||

Tuesday, January 10, 2012
skull pincushion
http://lolosinclair.blogspot.com
How to make a funny sugar skull pincushion.
 Bunch of my crazy Sugar Skulls!
Today is a good day to try to make some funny sugar skull pincushions or ornaments. It's The Day of the Dead! Dia de los Muertos. Don't be scared!
I had a lot of good time making them, I flew away with my imagination. I don't use a pattern for the decoration just follow my own instinct. You will be surprised with the result.
Let me show you my easy way to make them. One more thing, they are my own creations. Please don't copy them, just make your own in your own way! :-))

-Craft recycled felt ( little pieces )
-Embroidery Thread
-Stuffing
-A piece of paper to draw your skull pattern
-Some beads, ribbon, for extra decoration.
First you have to draw your own skull design in a piece of paper. Cut your design and then put it on your piece of felt.
After you cut the first side of the skull start making the decoration. For this use some embroidery thread in different colors.

I start first making the eyes and then the teeth.
 Then the flowers in the eyes.
 and more decoration till I feel happy with it.
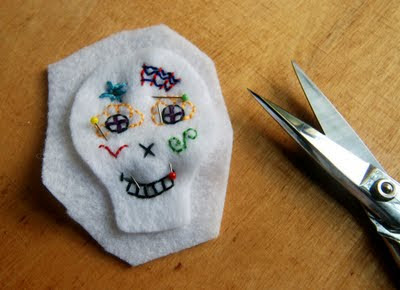 After you finished your embroidery put the other piece of felt at the back of the head. Hold it with some pins.
 Cut the second piece of felt following the shape of your skull.
 After you cut it start sewing the edges of the skull using black embroidery thread.
 Go around till you leave a little hole to put some stuffing inside.
 Now it's time to fill the skull with some soft stuffing. Use your little finger or chopstick to push the material to go in.
 When you are happy with the stuffing start closing the little hole.
 After you close it make a little knot at the back of the skull and cut the rest of the thread.
 Voila! you have and original and unique sugar skull creation!
 Orange beauty!
 Black Sexy!
 Hot Baby!
 Then the flowers in the eyes.
 and more decoration till I feel happy with it.
 After you finished your embroidery put the other piece of felt at the back of the head. Hold it with some pins.
 Cut the second piece of felt following the shape of your skull.
 After you cut it start sewing the edges of the skull using black embroidery thread.
 Go around till you leave a little hole to put some stuffing inside.
 Now it's time to fill the skull with some soft stuffing. Use your little finger or chopstick to push the material to go in.
 When you are happy with the stuffing start closing the little hole.
 After you close it make a little knot at the back of the skull and cut the rest of the thread.
 Voila! you have and original and unique sugar skull creation!
 Orange beauty!
 Black Sexy!
 Hot Baby!
Monday, January 9, 2012
pillow
Tutorial Tuesday: Halloween Pillow
I'm going to try to decorate more for the holidays, well the holidays that I really like :). I'm going to attempt to make at least one pillow. I wanted to make it really easy to change the pillow out, so I made a pillow case to go over one of my old throw pillows.

This is how I made it:
1) The pillow that I am covering is 17"x17". So I cut three pieces. The front one is 18 1/2"x 18 1/2". The back two are going to overlap, so one is 18 1/2"x12" and the other one is 18 1/2"x 10"

2) Next I cut out some heat transfer vinyl with my Silhouette. I used colors: purple, orange and silver from Expressions Vinyl

3) I ironed them onto the front piece of fabric.

Here is the design all ironed on

4) Next I took one of the backs pieces and then laid it onto the top piece, with the fronts together. Then I laid down the last piece. The two pieces overlap by about 6 inches.

5) I pinned it all together and then I sewed all four sides together.

6) I then stuff the pillow into the opening of the case.

And just like that I have a pillow for Halloween and I easily change it for the next holiday.
 http://craftskeepmesane.blogspot.com
 For the kids
felt play food
**I have recently added a tab for an Idea Room Flickr photo group. I am hoping that some of you will be interested in uploading pictures of the projects you have made from the Idea Room. I always love seeing what people have been able to make and I am sure you would like to see them too. So go ahead and start taking photos and uploading them. Since I am absolutely new to Flickr, I am hoping I have set it up so that it works. Let me know!

I realize all of my latest posts have been sugary treats! This cooler weather makes me want to bake. Even this post is food related, but at least these are calorie free.

Shhh! Don’t tell my daughter, but here is a sneak peek at what my girls are getting for Christmas this year. I have seen felt food all over the internet and as soon as I began to see them, I knew I had to make some for the girls.

To make this stackable ham sandwich, I used this tutorial here. Then after I got the hang of it, I kind of winged it and came up with some of my own designs for the lettuce, pickles and tomatoes. They really are very easy and require minimal sewing skills. If you don’t have a machine, you can hand stitch them as well.

I found a tutorial for the fried egg here and just made the bacon without any pattern. I also stumbled upon this site with a lot of different ideas for making felt food.

The strawberry pattern I used can be found here and the fruit slices were made using the patterns here and here. Then, after making the fruit slices, I used the same process and mad a slice of watermelon by cutting my felt in the same shape, but just larger.
And since I know some of you are going to ask, I got this fun wooden food play set fromAmazon.com.

I am so excited for the girls to see them on Christmas morning! If you know of any other free felt food patterns, I would love to know where to find some more. But beware…making felt food is very addicting.
Subscribe to:
Posts (Atom)