origami with left over gift wrap
Another bright week has passed at rocket speed and I am finally back to origami. I am so super excited today. It feels like the sun is shining too much light on me today. I have finally hit 100 followers and around 140 readers. It's time to tell you lovely people that I adore you, love you and seriously want to hug you for being there. You know it feels like an achievement when you share something people like and care enough to be there and appreciate.
"So here's the super love, hugs and kisses to all of you with all my heart"
Like I said before I made tons of origami things as it's so much fun and so less time consuming. I just simply couldn't stop. But according to the bi-monthly theme I work with, origami was supposed to end on February 28 but you know I have dedicated 3 weeks to bring valentine`s day ideas. That is to say I hope you also will feel the injustice to origami if we leave it now. So, I will be bringing a few more origami posts before we start some embroidery crafts. :-)
So that brings us to not 2 but 4 beautiful things we can make with paper to decorate our gifts and make them look and feel even more special and unique.
Now let us have a detailed look at how these were formed.
ORIGAMI SWIRL
- Start by taking a square paper and fold it into triangle ( left and right) and rectangle (horizontally and vertically). In this way you will fold four times. Pattern side up
- Now open the square and fold from the centre as shown below forming a triangle. Fold it into half
- Swirl the flaps around a pen or pencil in one direction.
- Open the flaps individually and your done.
ORIGAMI BLOSSOM
- Similar to swirl, folding into triangle and rectangle to get plus and cross creases. Pattern side down ( pattern side is up in the tutorial)
- Point of Notice: Fold the centre sides of the diamond (not square) as shown below forming a smaller diamond.
- Rotate the diamond such that the close side faces you. Now fold the right flap followed by left flap to the centre. Turn the paper and repeat.
- Fold the tip upward such that a crease is formed in the middle
- Just to make the tutorial easier to understand and colorful I folded the pattern side up. Follow the tutorial with pattern side down
- Now fold in half from the back and open the front flaps
- Done! Isn't it cute? :-)
ORIGAMI BOW
- Ok! So here we again go triangle and rectangle folds followed by folding the points at the centre forming small triangles. This is really a fun tutorial. :-)
- Now again fold the corners at the centre. Flip the side and fold the corners again at the centre.
- Now fold each triangle outwards forming a small creased line. Continue with the other 3 sides.
- Turn the paper and open the flaps- layer 1 and layer 2
- There it's complete. Now that's what I call fun, easy steps that you can never forget. :-)
BUTTERFLIES MY FAVOURITE
- Fold the paper into rectangles and triangles forming plus and cross creases. Open and fold the corners at the centre of the paper
- Open the paper you will get the following creases
- Now fold the left and right sides at the centre forming a rectangle.
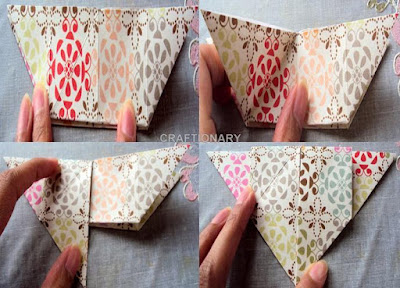
- Open the top as shown below and fold it into a trapezoid. Repeat with the other side.
- Simply fold it into half forming one trapezoid
- Turn it upside down and fold the left and right sides down forming a triangle as shown below:
- Fold the right side into a small triangle and repeat with the left side ( This is easier to understand form the picture). Fold the butterfly into half.
- Now we need to fold both the wings over to form the body. Fold the left flap over the right at an angle and fold the right flap over the left at the same angle.
- Open and pop the body out by folding the creases upward.
- We are done.
I hope you guys enjoyed these easy and instant models that can make your gifts look more special. :-)


No comments:
Post a Comment